1-Step BOM Import
1-Step BOM Import consolidates the information required for importing a BOM in one location. Following are the minimal steps to import a file:
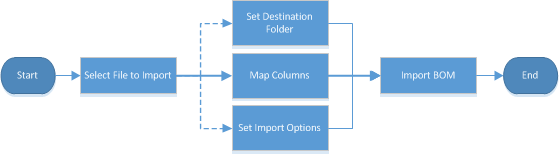
Select a BOM file
- After clicking Import a BOM File, the modal window appears. Either drag a BOM onto the Drag and drop... box, or click Browse to navigate to your BOM import file.
Supported import file formats include: Microsoft Excel (XLS, XLSX), comma separated values (CSV), and tab-delimited text files (TXT).
The file must contain a header row and at least one row of BOM data.
Click View sample BOM file to view a single-level BOM file with five columns.
Other fields on the 1-Step BOM Import page, and the import options in the Select tab are disabled until you select a file for import. The Import History tab is enabled regardless of whether a file is selected. - Verify or change the following file import parameters:
BOMs in Excel format with a single worksheet default to that worksheet. For Excel files with more than one worksheet, click the drop-down arrow in the right of the Worksheet field, and select the desired worksheet from the drop-down list. This option is saved if you decide to save the BOM import configuration.
If the worksheet is changed, the column mapping selections may also need to change.
Type the row number in which the column labels appear in the BOM import file. The column labels are mapped to fields in the Accuris Parts Database. For details, see column mapping. This option is saved if you decide to save the BOM import configuration.
In the selected BOM import file, ensure that rows after the column header row are either empty cells or contain the data to import.
By default, Use file name as BOM name is selected, which automatically populates the BOM Name field with the name of the import file (less the file extension). To override this name, clear the check box and type the desired name. The file name cannot be blank, and it cannot be Vault.
Enter a meaningful description of the import file.
- Click Remove to select a different file. Changing the file selection does not clear the file import parameters.
Import the BOM
- Prior to importing, click Preview & Validate to make sure your import selections are correct. Preview and validate is optional for flat-file BOM imports; however, it is required for indentured BOMs. Preview & Validate is disabled until you select a file for import and enter a BOM Name. If satisfied with the data displayed in the preview, click Confirm & Import BOM.
For more information, see preview and validate. - Click Import BOM. Import BOM is disabled until you select a file for import, accept or type a BOM Name, and either select an import configuration or manually select import options.
For more information, see import BOM.
- At any time in the import process, click Cancel Import, located in the top-left of the page. A modal window opens prompting you to confirm the cancellation. Click Yes, cancel this Import to return to the BOM Vault. Canceling the BOM Import is permanent and deletes all data currently entered. Click No! Do not cancel to return to the BOM Import process and continue the import.
- Click either Import Another BOM or View BOM in Vault.